Aircraft Of The Falklands War
![]()
 The
most important factor in the success of the Sea Harrier was undoubtedly
the all-aspect AIM-9L Sidewinder heat-seeking air-to-air missiles
rushed into service as the Task Force sailed to the South Atlantic.
The Argentinian's older rear-aspect AIM-9B Sidewinders, Matra Magic
and Shafrir missiles could only be launched when directly behind
their target as the seeker needed to lock onto the hot jet exhausts
emerging from the tail pipe. The AIM-9L had a longer range, and
more importantly its more sensitive seeker meant it could be fired
from any aspect. This, plus superior pilot training and better avionics
enabled the British planes to employ a looser and more flexible
formation than their opponents. Of twenty-seven AIM-9L Sidewinders
fired by Sea Harriers twenty-four hit their mark. Another six enemy
planes fell to the Sea Harrier's 30mm cannons.
The
most important factor in the success of the Sea Harrier was undoubtedly
the all-aspect AIM-9L Sidewinder heat-seeking air-to-air missiles
rushed into service as the Task Force sailed to the South Atlantic.
The Argentinian's older rear-aspect AIM-9B Sidewinders, Matra Magic
and Shafrir missiles could only be launched when directly behind
their target as the seeker needed to lock onto the hot jet exhausts
emerging from the tail pipe. The AIM-9L had a longer range, and
more importantly its more sensitive seeker meant it could be fired
from any aspect. This, plus superior pilot training and better avionics
enabled the British planes to employ a looser and more flexible
formation than their opponents. Of twenty-seven AIM-9L Sidewinders
fired by Sea Harriers twenty-four hit their mark. Another six enemy
planes fell to the Sea Harrier's 30mm cannons.
The greatest handicap of the British Task Force was the lack of airborne early warning radar. Up until then it had been assumed that Britain's carriers would always be working under a radar umbrella provided by shore-based Nimrods or American AWACS but in the far away Falklands no such support was available. This meant that rather than react directly to in-coming threats the Sea Harriers had to employ standing barrier patrols. With the limited number of Harriers available the enemy was often able to overwhelm the defenders and get through to their targets.
The Argentinians attacked these targets at very low level which made it difficult for the ship's surface-to-air missiles (SAMs) to track them, though the masses of light machine guns hastily added to every ship in the Task Force then came into play. However, the low level usually didn't allow the bombs enough time to arm before they hit. Many failed to explode or did so only after passing right through the light hulls of the ships.
Helicopters played a vital role for both sides in terms of transport and supply, and for the British in a more limited way as gunships attacking enemy ground positions.
BAe Harrier GR.Mk3
The Harrier used four swiveling nozzles to direct its jet thrust to any angle from the horizontal (for normal flight) to the vertical (for vertical take off and landing). Though this technically offers the Harrier the ability to slow to a standstill in short order by employing a VIFF, thrust Vector In Forward Flight, this was not a tactic that could be used too often in a dogfight as it uses up that most vital commodity of the fighter plane; energy.
No 1 Squadron RAF was embarked with the Task Force to replace any Sea Harriers that might be lost in action. They were quickly fitted out to carry a pair of Sidewinders, extra electronics were added, and their pilots given hasty training to familiarize them with operating from a carrier. However, Sea Harrier losses were lower than expected and the RAF contingent spent most of the war on ground attack duties. Six RAF Harriers operated from HMS Hermes before moving to improvised forward bases on East Falkland after the landings and a further four arrived later to make up for losses. The long 'Snoopy' nose enclosed a laser rangefinder, though few laser-guided bombs were used. Three Harriers were destroyed by enemy action.
ISA640a
BAe Sea Harrier FRS.Mk1
When the decision was made that the last of the Royal Navy's conventional aircraft carriers would be retired by the end of the 1970s the Government reluctantly agreed that a few fixed-wing jets could be added to the compliment of the new helicopter carriers about to be introduced. Only a jet capable of vertical take off and landing could operate with a decent load of weapons from these small ships and this meant the RAF's Harrier 'jump jet'.
Ten years after the Harrier was introduced a navalised version entered service with the Navy. In keeping with the need to make carrier aircraft as versatile as possible the naval version was given an air defence capability by adding a small nose mounted air-search radar and sidewinder missiles. During the Falklands the 'Shars' were always equipped with a pair of 30mm cannon pods and two Sidewinders.
Though their pilots were not trained or properly equipped for attacking ground targets Sea Harriers were used in that capacity, loosing two of their number to ground fire. Four more were lost to accidents whilst operating in weather conditions that would have grounded a conventional plane. Initially twenty aircraft were embarked on the Task Force's two carriers, twelve with No. 800 Squadron on Hermes and eight with 801 squadron on Invincible.
ISA641
Avro Vulcan
During the 1950s the British aircraft industry still felt it could afford the luxury of designing four different jet bombers to act as Britain's nuclear deterrent. Eventually three 'V' bomber types, all capable of flying near the speed of sound, were put into production. The Vulcan was the most striking of the three with a massive delta wing and no horizontal tail. It had a five-man crew, internal bomb-bay and suite of advanced electronics, and was the last of Britain's bombers in service. It was due to be retired when war with Argentina forced a flurry of upgrades, refits and other improvements to enable the small number remaining to operate over the extended distances of the South Atlantic. Seven high level bombing raids, code named Black Buck, managed to inflict varying amounts of damage on Port Stanley airfield. One Vulcan was forced to land in Brazil, where it was impounded for the duration, when its refueling probe broke.
ISA630
Dassault-Breguet Mirage IIIE
Europe's first fighter capable of Mach 2 speeds, the French Mirage III was simple, relatively robust, cheap and available to anyone who wanted to buy it. Though designed as a multi-role aircraft the Argentinians mainly used their Mirage IIIE fighters for air defence or escort. Armed with two 30mm cannon and two heat-seeking missiles. It was able to carry a single Matra R.350 radar-guided missile on the centre-line but the Argentinians decided that an extra fuel tank was a more useful load for the hard point. Two Mirage fighters were destroyed by Sidewinders.
ISA688
Israel Aircraft Industries Dagger
When the Israelis asked Dassault-Breguet to produce a cheaper version of the Mirage III the result was the Mirage V. Chief among the modifications were the replacement of the radar by a much simpler radar rangefinder and an enhanced ground attack capability. Following the Six Day War the French stopped supplying Israel with aircraft so they began to produce near copies of both the Mirage III and the Mirage V. The later was called the Neshr, or Dagger when exported to other countries. Armed with two 30mm cannons and up to two heat-seeking missiles, though these were more often omitted in favour of extra bombs for the ground attack role that the Daggers usually flew.
ISA688a
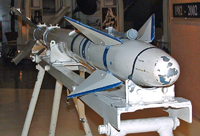
Dassault-Breguet Super Etendard
As the principle carrier plane for the French Navy the Super Etendard was designed to fulfill a variety of roles; fleet defence fighter, reconnaissance and strike aircraft. The result, though unexceptional in terms of its subsonic performance and weapons fit, found fame as the platform for launching the deadly Exocet anti-ship missile. Argentina had ordered fourteen Super Etendards but only five had been supplied by the start of the war and one didn't fly as it was used to furnish spares for the other four. Armed with two 30mm cannons and either bombs, heat-seeking missiles or a single Exocet.
ISA686
McDonnell Douglas A-4 Skyhawk
One of the legendary Douglas engineer Ed Heinemann's greatest aircraft. The A-4 single-seater attack plane was designed for the US Navy and was small enough to dispense with folding wings for stowage onboard carriers. A squadron of the more advanced A-4Q was initially based on the carrier Veinticinco de Mayo and two Air Force squadrons (one of A-4Bs and one of A-4Cs) operated from land bases. Armed with two 20mm cannons and bombs. Half of Argentina's A-4s were lost during the war including eight shot down by Sea Harriers, mostly by Sidewinders.
ISA836
BAe Canberra B.Mk62
At the start of the war Argentina still had six Canberra bombers along with two of the dual-control T.Mk64 trainer version operating with Groupo 2. The Canberra was mainly used in the ground attack role though four anti-ship sorties were carried out, including the sinking of a Liberian tanker mistaken for a British supply ship. One B.Mk62 fell to a Sidewinder early on and another, whilst under escort by Mirage IIIs, was downed by a Sea Dart SAM when on the way to attack British troops on Mt. Kent.
ISA608
Aermacchi MB.339
An advanced jet trainer dating from the late 1970s with a crew of two in a tandem-seat arrangement. Ten were operated by the Argentinian Navy most of which were based at Port Stanley airfield on the Falklands and five were lost to ground fire. Though no internal gun was fitted they normally flew with a 30mm cannon pod.
ISA694
FMA IA-58 Pucara
An Argentinian designed and built light attack and counter-insurgency twin propeller plane with a crew of two. Most were based at Port Stanley but several operated from remote airfields throughout the Falklands where they ended up captured or destroyed on the ground. Armed with two 20mm cannons and four machineguns plus a useful bomb load.
ISA899
Lockheed C-130 Hercules
Argentina employed ten of the four-engine Hercules propeller transports to bring much needed supplies (nearly 500 tons in all), reinforcements and heavy equipment, including air-search radar, to Port Stanley airfield. One C-130 on such a mission was downed by a Sea Harrier.
ISA869
Helicopters
For the British the most important helicopter was to have been the heavy-lift Chinook but, unfortunately for the ground troops, all but one was destroyed onboard the Atlantic Conveyor forcing them to make the long trek east from San Carlos on foot. The main burden of transport and supply therefore fell on the Westland Sea King (including eighteen of the anti-submarine version on the two carriers) toting up 4,600 flying hours, and the older Westland Wessex. Most auxiliary and other support ships of the Task Force, including HMS Endurance, operated at least one helicopter.
The Argentinian submarine Santa Fe was crippled by a combination of a Wessex dropping depth charges and a pair of Wasps firing air-to-surface missiles. Two Lynx helicopters from Type 42 destroyers used the modern Sea Skua missile to sink an enemy patrol ship and badly damage another. Lynx helicopters flew a total of 3,000 hours of missions. The Army and Royal Marines employed their Westland Scout and Aerospatiale Gazelle light helicopters to attack Argentinian positions with machineguns and either rockets or air-to-surface missiles. One Scout was shot down by a Pucara.
The Argentinians used their helicopters to transport troops and supplies to their garrisons scattered throughout the islands. They too had the Boeing Chinook, a couple of Lynx Mk.23s and the Sikorsky S-61 Sea King, plus a few SH-3 Jolly Green Giant versions of the S-61, the medium sized Aerospatiale/Westland Puma, two Agusta A109 Hirundos, and the venerable Aerospatiale Alouette III and Bell UH-1 'Huey'.
A109 use ISA636a, Alouette III use ISA634a, Chinook ISA864, Gazelle ISA692, ,Lynx ISA636, Puma ISA691, Scout ISA634a, Sea King ISA819 and ISA 819a, UH-1 ISA865, Wasp ISA634, Wessex ISA819a

Harrier 'Jump Jet'

Sea Harrier

Vulcan

Mirage

Super Etendard

Skyhawk

Canberra

Pucara

Hercules

Argentinian Puma
Click on the links below for more information